If you really want to bring your art to the next level, you
can apply the Golden Ratio to fine tune your paintings and help you create eye
catching compositions. I hope this article will help you to apply it in a
practical way.
Let’s start with Bob’s videos. If you’ve watched a lot of his videos, you’ll notice that he consistently places images in certain locations. These locations are “focal points” or locations to where the eye is naturally drawn when looking at a painting. As I watched more and more of his videos, it became apparent that he was using the “Rule of 3rds”. That is where the canvas is divided up top to bottom by thirds (Figure 1).
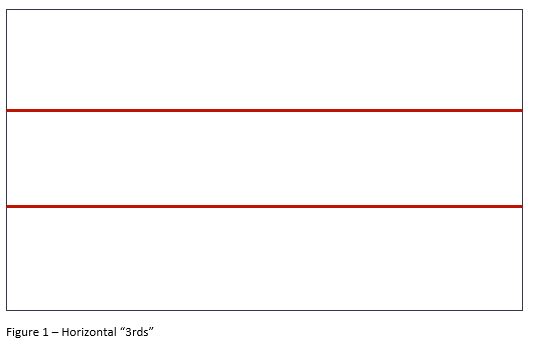
The horizon will usually be on the bottom red line while his fluffy clouds or happy mountains will usually be centered around the top red line.
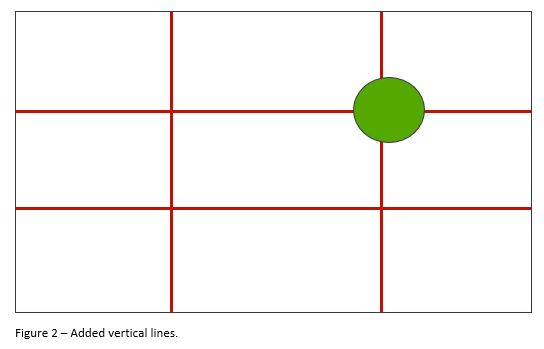
He doesn’t stop there; he also uses vertical “3rds” lines (Figure 2). He often placed his sun image at the intersection of the top horizontal line and the far-right vertical line. And of course, Bob’s Big Trees are placed to the left and right of the vertical lines to force your eye toward the intersection of lines in the middle, but not quite center, of his paintings.
Why did Bob do this? Presumably because it’s a quick approximation of the Golden Ratio, a method based on the Fibonacci Sequence used by the great Masters of Old.
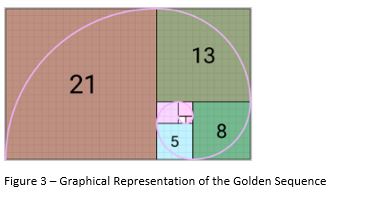
The Fibonacci sequence is a series of numbers in which each number is the sum of the two preceding ones. Numbers that are part of the Fibonacci sequence are known as Fibonacci numbers.
0, 1, 1, 2, 3, 5, 8, 13, 21, 34, 55, 89, 144, ....
This sequence is often depicted in art as a Golden Spiral (Figure 3).
You can see this spiral in the Mona Lisa (Figure 4)
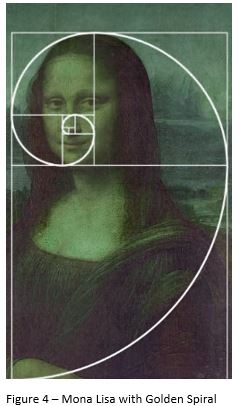
Notice that her left eye is on a “3rds” vertical line and
her head is on the top “3rds” horizontal line and each part of her face is on a
subsequent “3rds” division of those lines (don’t worry, I’ll clear this up in a
bit when I explain secondary lines).
We know that Bob was a highly trained and very competent artist so we must assume he was well versed in the Golden Ratio and that the “Rule of 3rds” was the quickest, easiest way to build it into a 27-minute video for a wide audience.
This worked well for “quick and dirty” paintings, but if you really want to bring your art to the next level, you can apply a closer approximation of the Golden Ratio to fine tune your paintings and it will help you create eye catching compositions (i.e., where to place your focal points). I hope this article will teach you to apply it in a practical method.
Before we begin, it should be noted that an aspect of the Fibonacci sequence is that you can divide a larger number in the sequence by the preceding smaller number, and starting around “5, 8”, you will start to see the result being 1.6 (8 / 5) and then as you increase in the sequence, the numbers refine and you will soon have 1.618 (89 / 55). This ratio of 1 to 1.618 is apparent throughout nature. For example, the ratio of your forearm is 1.618 longer than the length of your hand. This is interesting and how the number is derived is all well and good, but how you get there is not important for the practical purposes I'm describing in this article. I just want you to know where the 1.618 number comes from and that it's found throughout nature.
However, the 1.618 number is key in your compositions. Let's take a standard 18” x 24” canvas and multiply the length by 1.618 (24” x 1.168 = 38.83”).
“Hey that’s too big. It won’t fit on my canvas!”, you might exclaim.
Well, you’re right. But do this instead. Multiply the 24” by 0.618 and you get 14.83” (24 x 0.618 = 14.83”).
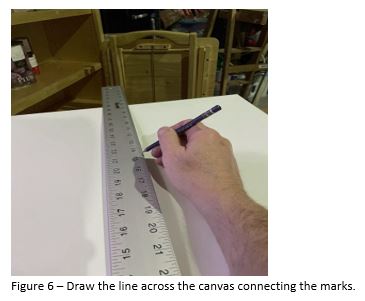
Now, place your canvas in a horizontal position. Starting on the right side, near the bottom, measure to 14.83” and place a small pencil mark near the edge (Figure 5).

Repeat this process near the top to make a similar mark at the top edge. Use a pencil to mark this edge of the canvas.
Use a straight edge to draw a line connecting your top and bottom marks (Figure 6).
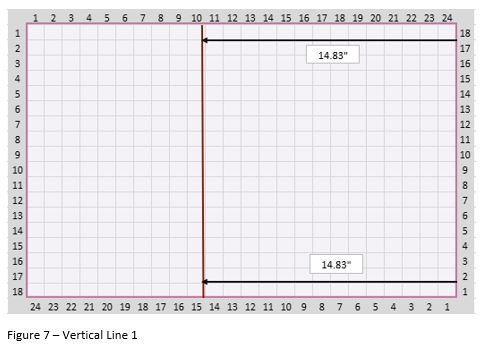
Congratulations, your first vertical line is in the exact
Golden Ratio position! (Figure 7).
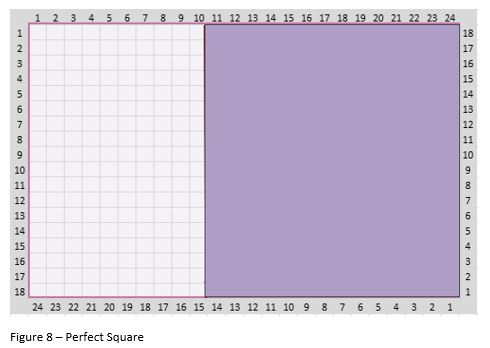
Just for fun, notice that on the right side of your canvas you have a perfect square (Figure 8).
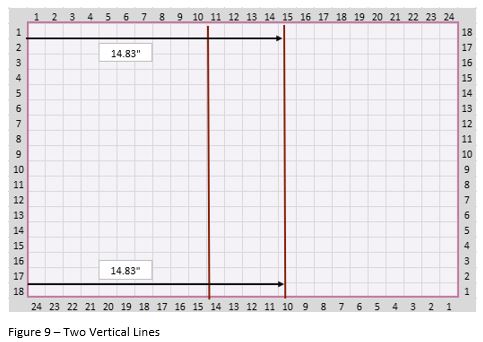
Ok so here is where it gets tricky. This time, measure from the left side of the canvas and repeat the process by measuring out to the 14.83” point, mark top and bottom and then draw a line to connect the marks. Now you have two vertical lines (Figure 9).
To create your horizontal lines, you need to multiply the
height of the canvas 18” x 0.618 = 11.12”.
Starting at the top of your canvas, at the left side, measure down
11.12” and make a mark with your pencil.
Repeat this process on the right-hand side. Connect the lines. This is your bottom line. Repeat the process from the bottom edge this
time and draw the top line. Now you
should have a grid drawn on your canvas (Figure 10).
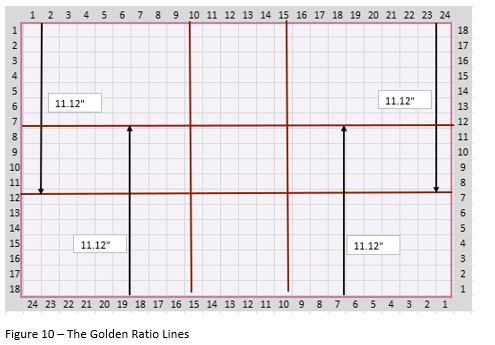
At this point, you have a canvas that looks a lot like what Bob did with his rule of “3rds” (Figure 2). However, your lines are now 0.28" more accurate. I know that doesn’t sound like a lot, but I think the Old Masters would argue with you.
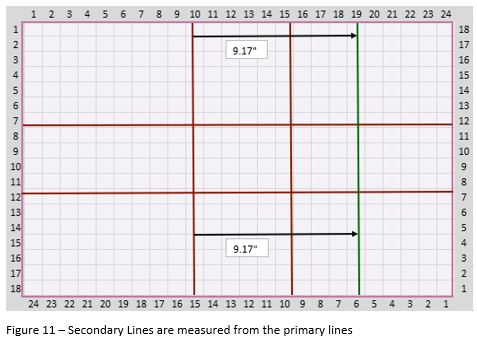
In any case, your new fancy accurate lines lend themselves to the next step, the creation of secondary lines. Secondary lines are where other elements can be added to your composition or, if the primary lines are not available, a secondary line can be used for your main elements. And sometimes, it just doesn’t feel right to use a primary line so try a secondary line.
For the next step, instead of measuring from the edge of the canvas, you apply the 0.618 measurement from a primary line. So, the primary division was 24” x 0.618 which gave us 14.832”. Therefore, the secondary division will be 14.832” x 0.618 which equals 9.17”. Using the left vertical primary line, measure to the right 9.17” and mark this location on the canvas and draw your line from top to bottom (Figure 11).
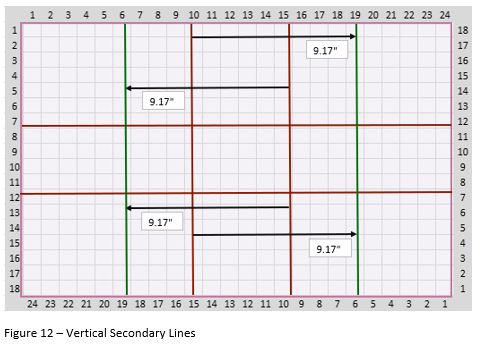
Repeat the process from the right most primary line and you will now have both vertical secondary lines (Figure 12).
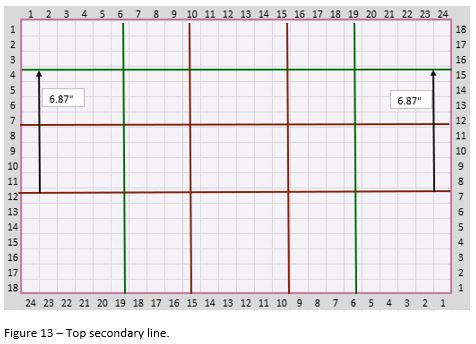
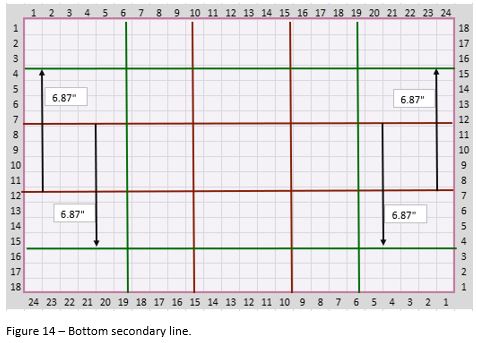
Now do the same thing for the horizontal lines measuring from the bottom horizontal line going up. Since our primary line lies 11.12” down from the top of our canvas, multiply 11.12” x 0.618 and you get 6.87”. Mark this spot on the left and write of the canvas and connect with a horizontal line (Figure 13).
Repeat the process from the top horizontal primary line (Figure
14).
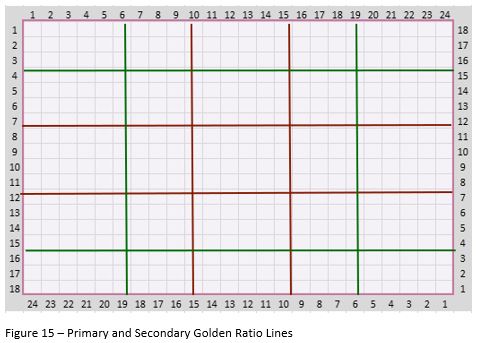
In the end, you will have a grid. Here is what the end result should look like (Figure 15).
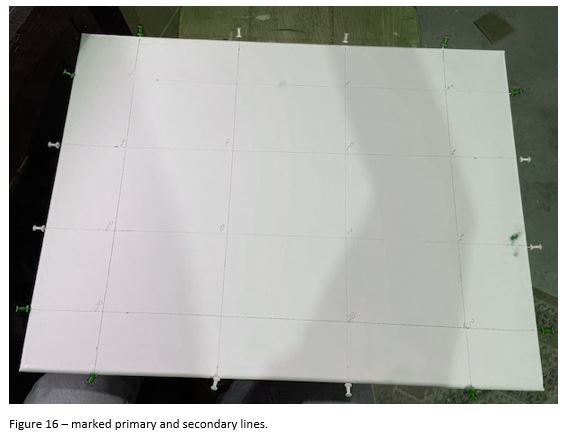
You can use push pins to mark the line on the side of the
canvas (Figure 16). Personally, I like
to use white push pins for the primary lines and green or yellow to mark my
secondary lines. I use the push pins to
mark the lines because after I put magic white on the canvas, my lines on the
canvas disappear.
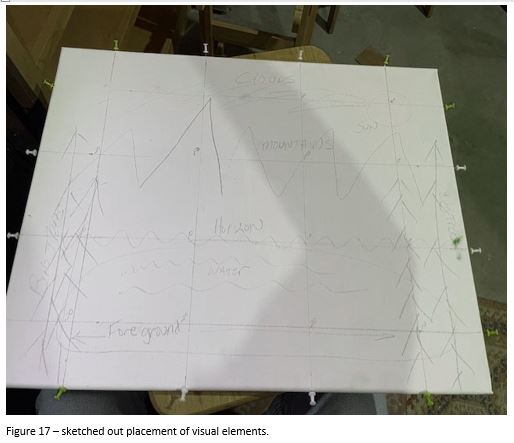
Now, before I get to painting, I like to plan out where the
various elements of my painting are going to go and I try to place them where I
want the viewer to focus on intersections of the primary or secondary lines. I have an example below (Figure 17).
I hope this helps you make exceptional compositions and elevate your paintings. Also, Andrew Tischler has a fantastic video on this subject on his YouTube channel. Check it out.
https://youtu.be/wntIMD9wbR0?si=iPSxz0wvDjE9uYW6
I learned about the "rule of third" a week ago by taking a mandatory online course (initiation to photography). Your article is spot on!